 |
| The Early Days
Hello good people! Wow it's been a long time since I've been here with news from the holler and of course, lots of changes have taken place, with more to come.
After my last post, spring hit fast and hard here and I was determined to make a valiant effort to win the battle over the weeds, brush, rogue trees and the like. I had fabulous plans for landscaping and gardening and lovely evenings entertaining amid the beautiful results. I did accomplish alot of hosta and daylilly digging and dividing and transplanting, some weed removal and planted flats and flats of seeds, which subsequently drown on the front porch during a surprise downpour and were never revived.
After the initial spring fling in the yard, I moved quickly into the "I really want a puppy" campaign with Darlin' Mark. After agreeing that no more pooches would share our humble abode after the loss of Sweet Annika last summer, I caved. I simply had run out of things to talk to myself about and needed another living creature to communicate with on a daily basis. And I love puppies. And so the puppy search began! I made a visit to the Dubois County Humane Society after seeing a littler of perfectly adorable Boxer/Lab mix puppies on the website and filled out my adoption application. Which of course required a background check, fingerprints, DNA testing, a psychological evaluation, home visit, references, parenting classes, credit check and agreement to donate all my vital organs to dogs in need. Well, maybe not quite that extensive, but not far off.
But then Darlin' Mark, who I affectionately refer to as "the dog snob" determined that if we were to embark on parenthood again, we would get a "real dog." So one Sunday afternoon, we loaded up in the Expedition to go meet the lovely people who advertised a fine littler of Labrador pups for sale in Leitchfield KY. While in route, I received a text from the lovely woman stating that the Chocolate had just sold, leaving only 1 Black boy. "But my husband says he's the best." Well, of course he does!
After carefully inspecting the pup, performing several very objective tests to determine his health, temperament and intelligence and I hugged, held, petted, kissed and squeezed on him, Darlin' Mark happily handed over a significant sum of hard earned dollars and Edsel Henry Rainford came home to the holler!
And I am happy to report that the lovely woman's husband did not exaggerate. Despite Edsel's tendency to eat anything at anytime in any quantity, jump approximately 5 feet straight up when excited, tear through the house like a lunatic for no good reason, roll in mud, dive into any body of water within sight, destroy paper, cardboard and toys with amazing efficiency, retrieve until he nearly passes out, eat peaches and green apples until he poops himself senseless, run off to the neighbors to sneak cat food and chase children, he is a fine pup!
That brings me back to changes and where I've been....Darlin' Mark has made a tour through Memphis TN and northern Mississippi. We bought and sold and bought another RV and made a trip to Gulf Shores with Edsel in tow. I've made multiple trips to Mississippi and up north to home. A bad tonsil led to a tonsillectomy in Brother in Law Lou and ended up in lymphoma. So he and Big Sis Marybeth have been spending time with the fine folks at the oncology office and learning more about chemotherapy than they ever cared to know. Pops has had an ongoing battle with a new leg brace and the kind professional who crafted it. Amazingly enough that good man has not strangled Pops with the Velcro straps that hold it on his leg. Darlin' Mark has now moved on for a multiple year project in lovely Pryor, Oklahoma and I am in process of obtaining a nursing license and going to be helping set up a second home there. So I'll be coming to you from either the holler or the prairie!
Many days cookies, bread, cakes and pies have had to take a back seat to work, travel, doctor visits, games of fetch and trips to the vet. Some weeks I have managed to crank out some general purpose bread for daily consumption. Some weeks the oven has grown cobwebs. But that's how life goes. I've come to learn that the only thing that comes of planning is the need to change the plan.
Now, on to today's recipe! This is inspired by Edsel. The dog who will eat anything but tolerates nearly nothing at all. How can something that will ingest cardboard, plastic, dirt, rocks and any manner of human food have such a sensitive tummy? We've had one scare with a partial bowel obstruction and I spend way more time than I ever imagined wondering what the poop consistency of the day will be. After a protracted period of progressively runnier poos than normal, I decided to cut out anything but his kibble and daily dental bone to see what might be the culprit. This meant no extra treats, which in Edsel's mind is just one step short of utter starvation. The excretory process improved leading me to suspect that purchased treats and snacks might be contributing. Many pups don't tolerate wheat products well so I decided to put some of my gluten free flours to use and get busy making canine cookies.
I am happy to report that Edsel enthusiastically endorses these! But Edsel eats toilet paper.
I made this recipe twice. Once using a gluten free all purpose flour blend and the other using brown rice flour only. The flour blend will give you a slight rise in the treats while the brown rice flour treats will be uniformly flat. Edsel doesn't seem to have a preference.
Gluten Free Pumpkin Carrot Ginger Dog Cookies
Makes 24-36 Cookies (depends on size and shape)
Ingredients
2 1/2 Cups Brown Rice Flour
2 Tbsp Milled Flax Seed
1/2 Tsp Ground Ginger
3/4 Cup Pureed Pumpkin
1/2 Cup Grated Carrot
2 Large Eggs
Process
Preheat oven to 350 degrees and line 2-3 large baking sheets with parchment paper
Find 1 very patient and hungry puppy to assist you in the kitchen.

Are they done yet?
Assemble all your ingredients

In a large mixing bowl, combine the brown rice flour, flax seed and ginger

In a medium mixing bowl, combine the pumpkin and eggs

Stir in the grated carrots
 
Are they done now?
Add the pumpkin mixture to the flour mixture

Mix until well combined and resembling sugar cookie dough consistency

Pat dough into a disc between two pieces of wax or parchment paper and using rolling pin roll to about 1/2 inch thick
 
What is taking so long?
Dust the counter top with rice flour, turn the dough out and roll to 1/4 inch

Cut into desired shapes and place on parchment line baking sheets

Prick them with a fork and if desired, make an egg wash out of 1 egg beaten with 1 tsp of water and brush the cookies before baking. This just gives them a darker, shinier appearance.
Bake for 20 minutes, take out and turn over. If using egg wash, brush this side and then bake another 20 minutes.

I'll just keep an eye on these
Cool completely before serving to pooch

Geez this is ridiculous

Finished cookies from both recipes. Brown rice flour and egg wash on left, gluten free flour blend on right.

After three attempts to snap a pic of Edsel enjoying his treat before he inhaled it, I gave up. Here he is lounging about in the yard waiting for me to heave this plastic lid until he drops of exhaustion.
Hope you enjoy making treats for your pooch. This recipe should adapt easily to using some of your pups favorite ingredients such as applesauce, peanut butter, sweet potato. Just remember, not all foods are safe for our pets. We all have heard the warning about chocolate but many others are dangerous as well. Follow this link for a list of some of the most hazardous foods for dogs Hazardous Food List
Edsel is currently raising funds for our local no kill shelter, The Dubois County Humane Society. And vying for supermodel status as the featured pet on the 2015 calendar! All donations go directly to the shelter. Follow the link below to donate and/or vote. All donations are tax deductible!
.jpg) |
Monday, August 25, 2014
Black Beast Doggy Treats
Monday, April 7, 2014
The Last First Thing
 |
| Mary McWilliams Jones 9/12/1927 - 4/8/2013 |
On April 8, 2013 my family started our journey on our year of firsts without our wife, mom, grandma and grandlady; Mary McWilliams Jones. One of the hardest parts of this past year has been figuring out how to handle all these firsts without the person who guided you through all the others. We were all left here to help each other find our way through these uncharted waters. It hasn't been easy, but we've made it. And I think Mom would approve of the way we've handled most of them. And she wasn't easily impressed.
The day Mom died my youngest, Sam, had his first experience with joy through sorrow when that afternoon I had to call him with the news that his grandma was gone and that night his beloved Louisville Cardinals won the NCAA National Championship. He just knew that grandma had a hand in that. He might be right. Turns out Mom won the family bracket pool that day. Just like the year before.
Just twenty days after mom passed away, Dad had to go through the first wedding anniversary in 68 years without her. A couple days later, Marybeth had her first birthday. We've made it through Mother's Day, Thanksgiving, Christmas and New Year's, family dinners and more birthdays. My daughter, Nicole, was overwhelmed when she received the first birthday card in 31 years that didn't have her grandma's signature.
After fifty two years of general clumsiness and countless flops, I finally managed to break my first bone. The now infamous flip flop incident. I could just see Mom shaking her head and throwing her hands up as if to say "Good Lord, how does a person manage that?"
And so today, we find ourselves facing the last first thing. The first anniversary of the last day we had Mom with us. We know this doesn't mark the end or beginning of anything. Our grief will continue. It doesn't have a time limit. But with each first, we grew a little. We found strength in each other and in ourselves. We will continue to move along through life and handle what comes our way. Mom would expect nothing less.
I'm including a handwritten recipe from Mom below. Short, sweet and to the point. Hope you try it out.

Sunday, March 30, 2014
The Chocolate Chip Cookie Affair

Darlin' Mark was here for just a few brief days and now off again. He's gone to the land of beer and cheese to get all educated on things he's only been doing for the last 30 years. Got to love corporate America! So I find myself back here in the holler with no one to feed or pester again and had to come up with ways to pass the days until he returns for yet another fleeting moment.
I have spent countless hours over the years trying to come up with the perfect Chocolate Chip Cookie. And about 3-4 years ago thought I had found my one true cookie. It is a delicious cookie and has been my go to recipe since that time. And while I have never been disappointed, I have always had that nagging feeling that maybe, just maybe there's something more out there.
Then Cook's Illustrated made me an offer I couldn't refuse. A deeply discounted online membership opportunity that opened the door to thousands of recipes. And there, right before my eyes, they were boasting the Perfect Chocolate Chip Cookie recipe. I was able to resist the temptation to stray at first. But as the hours passed and I couldn't get the image of those gorgeous cookies out of my mind, I found myself back at the site flirting with this exciting new find.
I was pleasantly surprised to find that many things about these new cookies were very much like my present cookie. Melted butter, higher brown to granulated sugar ratio and a combination of egg and egg yolk are all part of the foundation of my cookies. But the exotic allure of using browned butter, dark brown sugar and a higher fat to flour percentage was more temptation than I could resist. I had to see what I might be missing.
Freakin' good cookies! That's what I've been missing. The browned butter bumps the richness and depth of flavor up several notches. Using dark brown sugar with the browned butter gives the toffee undertones that Cook's promises. The texture is wonderful, slightly crispy around the edges and soft and chewy in the middle. And they have that wonderful gourmet cookie appearance with the beautiful crackling on top and a warm brown sheen. I love chocolate chip cookies!
Because of my personal obsession with sweet and salty things, I bumped up the salt in the recipe. And I also plan to make the next batch with walnuts or pecans, haven't decided which yet.
In addition to the flavors brought about by the ingredients above, Cook's indicates that the specific process for whisking and resting the batter during the process allows the sugars to dissolve more completely creating the chewy texture. They also discovered that the larger cookie size makes it possible for the contrasting crisp and chewy parts of the cookie, rather than one consistent texture throughout.
Once again...my issues with AV equipment return. I discovered a dead camera battery just as I started browning the butter and I just couldn't deal with the Iphone photo process. Alas, I shall produce photos of some of the more pertinent steps of the process during the next batch and share those for reference.
Perfect Chocolate Chip Cookie (adapted from Cook's Illustrated)
Makes 16 Large Cookies
Ingredients
1 3/4 Cup All Purpose Flour
1 Tsp Baking Soda
14 Tbsp Unsalted Butter
1 Cup Dark Brown Sugar, Packed
1/2 Cup Granulated Sugar
2 Tsp Vanilla Extract
1 1/2 Tsp Salt
1 Large Egg
1 Large Egg Yolk
1 1/4 Cup Chocolate Chips
1/2 Cup Chopped Walnuts or Pecans (optional)
Process
Preheat oven to 375 degrees and line two large baking sheets with parchment paper.
Whisk flour and baking soda together in small mixing bowl, set aside.
In medium skillet, melt 10 tbsp of the butter over medium high heat. Once melted, continue to cook lightly swirling the skillet constantly while the butter browns. Cook until butter begins to turn golden brown and has a nutty aroma.
Using a heat proof spatula scrape browned butter into a heat proof bowl and add the other 4 tbsp of butter and gently stir until completely melted.
Add sugars, vanilla extract and salt and whisk until combined.
Add egg, egg yolk and whisk until completely smooth and no lumps of sugar remain. Let rest for 30 seconds and then whisk again for 30 seconds. Repeat this step 2 more times.
Using spatula or wooden spoon, stir in the flour mixture until combined.
Stir in chocolate chips and nuts, if using, making sure all flour has been combined.
Divide dough into 16 portions, 8 cookies per sheet and bake in 2 batches until edges start to set and lightly brown and centers still look moist. Approximately 12-14 minutes, rotating half way through baking. (Mine baked in 11 minutes so just keep a close eye on them the first time to determine baking times for your oven.)
Remove pan to rack to cool and store in airtight container.

In case you're wondering, these cookies are an excellent choice for dinner when all alone in the holler on a Sunday night.
Monday, March 24, 2014
Cinnamon Raisin Biscuits? I Think Not!
Many of you may recall from the Facebook page last week that Gluten Free Friday was going to feature Cinnamon Raisin Biscuits. So what do ya think? How do they look?

Not very biscuit like, you say? You would be right. These are Cinnamon Crumb Cake Muffins. Why no biscuits, you ask? Because the biscuits were vile. There's simply no other way to put it. And even taking into account that I have succumbed to an invasion of gastrointestinal creatures who are hell bent on making my life miserable, leaving me to subsist on toast and ginger ale for the past couple days, it doesn't explain the complete lack of taste and revolting texture that I produced in said biscuits. I have to believe that they are representative of what a mud pie would taste like if you chose to actually eat it.
So, I popped those suckers in the trash because not even the wild creatures roaming in my back yard deserve anything that bad. Hey Darlin' Mark! Don't feel bad about missing out on this particular adventure. It would definitely lead you to question my motives and whether that life insurance policy might be somehow involved.
I will not be defeated though! I shall persist and return to the biscuit project soon and come out victorious! Until that time, let's talk Cinnamon Crumb Cake Muffins.
These little gems are very tasty. And very muffin-like in their texture. I would say ever so slightly more "chewy" than a wheat flour based muffin and the crumb topping could use a bit more butter I believe to help reduce some of the "raw" flour aftertaste I noted. But overall, nothing that would make someone pause and wonder what was going on with these muffins. As a matter of fact, son Corey wandered in around midnight from his return trip from Idaho and downed one without comment.
I believe I would increase the cinnamon in the muffin mix to a full teaspoon, but I like alot of cinnamon flavor. If you prefer a milder cinnamon taste, then stick with the 1/2 teaspoon. The recipe would also lend itself to other modifications such as the addition of cinnamon chips or toffee bits. Or maybe some chopped pecans in the crumb topping. Coconut would be a great flavor to consider as well.
Once again, I used the Namaste Perfect Flour Blend for this recipe. But the recipe itself came from http://freerangecookies.com/ I browsed through several of the recipes she has there for lots of baked goods and plan to give some more a try. Keep in mind that many commercially prepared GF flour blends may already contain xantham or guar gum. When using gluten free recipes be aware you may not need to add these ingredients if using one of those blends.
And now, without further delay, on to the recipe. I would be thrilled to provide more photos for you, but if you follow me on Facebook, you are aware that my camera cable has apparently entered some kind of witness protection program for photographic devices. Or I left it with Darlin' Mark in the Mississippi Mansion. Or it's just plain lost.
GF Cinnamon Crumb Cake Muffins (makes 12 regular muffins)
Preheat oven to 350 degrees, line muffin pan with paper or foil liners
Ingredients
Muffins
2 1/3 Cup GF Flour Blend*
3/4 Cup Granulated Sugar
1 Tbsp Baking Powder
1/2 Tsp Cinnamon
1/4 Tsp Baking Soda
1/8 Tsp Salt
1/8 Tsp Nutmeg
2 Large Eggs
1/2 Cup Melted Butter or Oil
1/2 Cup Milk
1/2 Cup Greek Yogurt or Sour Cream
1 Tbsp Vanilla Extract
*if flour blend does not contain xantham gum, add 3/4 tsp to dry ingredients
Process
In large mixing bowl, whisk together all dry ingredients, form well in center of dry ingredients.
In medium bowl, mix all wet ingredients.
Add wet ingredients to flour mixture and fold to mix until just moistened. Do not over mix.
Let sit for 15 minutes while preparing crumb topping.
Crumb Topping
Ingredients
1/3 Cup GF Flour Blend
3 Tbsp Granulated Sugar
3 Tbsp Melted Butter
1 Tsp Cinnamon
Process
Mix all dry ingredients in small bowl, add melted butter and combine until crumbly mixture.
Fill muffin cups 2/3 full with batter and top with crumble topping. Bake in center of oven for 20-25 minutes or until toothpick comes out clean or with few moist crumbs.
Let cool on rack for 10-15 minutes.
Muffins had best flavor and texture served warm. Retained taste and texture next day with warming in microwave.
And if anyone needs a good recipe for Cinnamon Mud, just drop me a line. I've got one for you!

Thursday, March 6, 2014
Set the Gluten Free!
 |
| GF Banana Blueberry Bread |
And no, as far as I know, there's no one here in my immediate little world who is gluten intolerant or trying to live the gluten free lifestyle either. So what's my motivation for embarking on my gluten free education and baking adventures. First, I know that there are many of you out there who do have medical or personal reasons for eating gluten free diets and I want to provide alternatives, information and entertainment for you as well. Second, I love a challenge! And learning to bake gluten free cookies, cakes, muffins, biscuits and breads sounds like a challenge to me.
My goal here is not to be any kind of "gluten free" expert. I wouldn't slice up this bread and serve it to anyone claiming it's gluten free. All the ingredients are gluten free, but if there was a Geiger counter for gluten, it would be ticking like crazy in my kitchen. To make sure foods you produce in your home kitchen are gluten free takes preparation and planning. Check out some of these resources for information on how to set up a gluten free home kitchen. http://www.celiaccentral.org/gluten-free-food/keeping-a-safe-gluten-free-kitchen/ and http://www.cookinglight.com/food/recipe-finder/gluten-free-kitchen-00412000075547/ .
What I hope to do is bring delicious baked items to you using tested recipes with gluten free products. I will work to identify what I feel are the best products, ingredients and techniques to produce all the tasty things I love without the gluten.
How did I decide on this Banana Blueberry bread as the first edition for GF Fridays? In starting my research there are lots of suggestions for types of baked goods to start with when just beginning to go gluten free. Cookies, brownies and quick breads seem to be some of the items that are easiest to work with.
As I've noted in previous posts here, I often look around the kitchen to see what might need to be used and this time it was bananas. How fitting since I'm headed to the land of Elvis with Darlin' Mark next week. As we know, the King loved bananas. But don't look for peanut butter in this recipe. There shall be none. Let it be known, I do not cook with peanut butter. An ugly kindergarten incident with a peanut butter cookie scarred me for life and peanut butter combined with anything sweet shall never cross my lips! Sorry, I was briefly distracted by a horrible childhood memory there. On to the GF Banana Blueberry Bread.
I used Namaste Gluten Free Perfect Flour Blend for this recipe because it was the only one I could find in my rather limited grocery options here in the scenic Birdseye area. They had a recipe on the package for banana bread and I adapted this recipe from that.
I think it's pretty darned good. It looks, smells and tastes like banana blueberry bread. I'm not judging things based on how they taste for a gluten free product, because I don't know what gluten free usually tastes like. The only things I can tell you about this bread when comparing it to other banana breads I've made, it's not as heavy and dense. A little lighter texture. It's not as sweet, maybe because the natural sugars present in wheat flours aren't there. It is very moist and very tasty. I think you could serve it to anyone and they'd never know it's gluten free. Which is really what I'm hoping to accomplish with these recipes.
The original recipe was banana bread only. I added blueberries because I like them and had some. No other real reason. I also decided right before mixing it up that I wanted to add cinnamon and nutmeg. This is why you won't find these ingredients in the little group photo shot. I think it was a good decision. I think the bread could have been a little bland without them. The recipe also specifies to sift the baking mix, soda and salt. Don't skip this step. The baking mix is very heavy and almost clumped from the container and I don't think would give you a consistent or well mixed batter without sifting. Also keep in mind if you are unsure if any ingredients are gluten free, check the labels. Check this link for a comprehensive listing of the gluten status of tons of foods as well, http://celiacdisease.about.com/od/glutenfreefoodshoppin1/ss/Gluten-Free-Food-List.htm
Other than those few things, it was really a very straightforward and simple recipe, like most quick breads. You combine the wet ingredients, you combine the dry and you fold them together and bake. I did have a little anxiety when trying to determine if the bread was done, since it seems the hot loaf is a little "gummy" appearing when you try the toothpick test. So I just baked it for the 65 minutes on the recipe and it turned out fine.
 |
| Don't forget the cinnamon and nutmeg |
GF Banana Blueberry Bread (makes 1 9x5 loaf)
Ingredients
2 Cups Gluten Free Perfect Flour Blend
1 Tsp Baking Soda
1 Tsp Ground Cinnamon
1/4 Tsp Ground Nutmeg
1/8 Tsp Salt
1/2 Cup Canola Oil
3/4 Cup Granulated Sugar
1/4 Cup Brown Sugar, Packed
2 Large Eggs
3 Ripe Bananas, Mashed
1 Tsp Vanilla Extract, Gluten Free
1/2 Cup Chopped Walnuts
1/2 Cup Whole Fresh or Frozen Blueberries
1 Tbsp Raw Sugar for Sprinkling
Process
Preheat oven to 325 degrees, lightly spray loaf pan with non-stick spray
In a medium mixing bowl, sift together flour blend, soda, cinnamon, nutmeg and salt.
 |
| Notice the late decision for cinnamon and nutmeg |
In a large mixing bowl mix together canola oil and sugars, whisk to combine until smooth.

Add eggs and whisk until mixed.
 |
| Kinda gloopy, not smooth like creaming. |
Add mashed bananas and vanilla extract and mix well.
 |
| Just like a Blizzard....a big bowl of schmooshed bananas! |

Add dry ingredients, walnuts and blueberries to banana mixture and fold until just combined.

 |
| Still kinda lumpy and gloopy, but that's just fine. |
Pour batter into loaf pan, sprinkle raw sugar on top and bake 65 minutes

Cool in pan on rack for 30 minutes, then remove from pan and finish cooling on rack before slicing and serving.

Sit down with a slice of bread and nice cup of tea and watch Jailhouse Rock. Elvis would approve.
 |
| Thank you, thank you very much! |
Monday, March 3, 2014
Cupcakes and Hurricanes
 |
| Laissez les bon temps rouler ! |
I originally thought I'd make a traditional King Cake and post it here but it seems that, contrary to recent rumors, cupcakes are still quite popular. So I started pondering options for a King Cake inspired cupcake. I first made a vanilla cupcake with a cinnamon brown sugar swirl. Don't know if it was the cake recipe or the cinnamon swirl, but it just didn't do it for me. Next I decided to make traditional King Cake dough, roll it into a log but instead of forming the ring at this time I cut it into small circles the size of muffin tins and baked little individual King Cakes. These were actually quite good. The dough was tender and the cinnamon sugar filling provided just the right amount of sweetness. While I liked these a lot, they weren't really cupcakes. So, back to thinking.
I researched the history of the King Cake a little more and decided to just create a cupcake using the traditional flavors. King Cake dough is traditionally a very plain dough with little sugar or strong flavor. It's usually wrapped around a cinnamon filling and then iced with a sugar glaze and decorated with the colors of the festival; gold, purple and green. Oh, and the baby hidden somewhere in the cake.
Below is the final version of my King Cake Cupcake recipe. A basic vanilla cupcake, cinnamon pastry cream filling and cinnamon Italian butter cream icing finished with the colors of Mardi Gras using food grade luster dust. I was concerned that if someone were to eat a cupcake the way my son Sam does, all in one bite, a baby could become a health hazard. Resulting in either a dental emergency, chocking hazard or removal of said baby from the innocent victim's intestinal tract. All unpleasant options. So try substituting a pecan half for a baby.
Just a few notes before the recipe. I am by no means an expert on Italian butter cream icing. In fact, this was my first attempt. And I decided to use it here primarily because I've been wanting to experiment with making and piping it. You could also use a basic powdered sugar type butter cream to make the cinnamon icing and it would work just as well. If you are interested in the Italian butter cream method I used, here is the link http://www.cookstr.com/recipes/italian-meringue-buttercream I didn't have the extra fine sugar and used regular granulated sugar without any problems.
I would also tell you that if you want a simpler version of the cake, you could just as easily add 1 teaspoon of ground cinnamon to the cupcake batter and skip the pastry cream filling. Though if you decide to make the Italian butter cream you will have egg yolks laying around and can easily make up some pastry cream.
And now, finally, the recipe. Again, no pictures for the same reasons noted in the Fudgy Mint Brownie recipe. General crankiness and kitchen mess. I promise I'll be better after taking my week of vacation later this month.
King Cake Cupcakes (makes 12 cupcakes )
Ingredients
1 1/2 Cup All Purpose Flour
1 Cup Granulated Sugar
1 1/2 Tsp Baking Powder
1/2 Tsp Salt
*If not using pastry cream filling add 1 tsp of ground cinnamon to dry ingredients
8 Tbsp Butter, Room Temperature
1/2 Cup Sour Cream
1 Large Egg
2 Large Egg Yolks
1 1/2 Tsp Vanilla Extract
Process
Preheat oven to 350 degrees and line muffin pan with paper or foil liners or spray with baking spray
In medium mixing bowl or bowl of stand mixer, whisk flour, sugar, baking powder, salt (and cinnamon if using)
Add butter, sour cream, egg and egg yolks and vanilla extract on beat on medium speed until all flour is incorporated and no lumps in batter
Scrape down sides and bottom of bowl to make sure all flour is thoroughly combined.
Fill cupcake liners 2/3 full.
Bake on middle rack of oven for 18-23 minutes, lightly browned and toothpick comes out with a few moist crumbs or clean.
Cool in pan on rack for 10 minutes. Then remove cupcakes from pan and cool completely on rack.
While cupcakes are cooling you can prepare the pastry cream filling.
Cinnamon Pastry Cream
Ingredients
1 Cup Whole Milk
5 Tbsp Granulated Sugar
3 Large Egg Yolks
1 Cinnamon Stick
1 Tbsp Corn Starch
1 Tbsp Flour (rice flour if you have it, otherwise all purpose is fine)
1 Tbsp Unsalted Butter
You will also need a fine mesh strainer.
Heat milk, 1/4 cup sugar and cinnamon stick in medium saucepan or medium low heat until almost boiling.
While milk is heating, in medium mixing bowl whisk egg yolks and 1 Tbsp granulated sugar until light yellow and thickened. Sprinkle in corn starch and flour and beat until well combined.
When milk has warmed to just before boiling, remove cinnamon stick and pour very slowly into egg mixture while continuously whisking. Once all milk mixture has been added, pour it through the fine mesh strainer back into the saucepan and whisking continuously over medium high heat, cook until thickened or reaches 160 degrees.
Remove from heat and whisk in butter.
Pour into bowl and place plastic wrap over pastry cream, pressing it on the surface to a keep it from forming a skin and refrigerate for at least 2 hours or until ready to fill cupcakes. Can be kept in refrigerator for 3 days.
Traditional Butter Cream Frosting
Ingredients
1 Cup Unsalted Butter, Softened to Room Temperature
3-4 Cups Sifted Powdered Sugar
1/4 Tsp Salt
1/2 Tsp Ground Cinnamon
1 Tsp Vanilla Extract
2-4 Tbsp Milk or Cream
Process
In large mixing bowl with hand mixer or in bowl of stand mixer with paddle attachment, beat butter on medium speed for 3-4 minutes. Turn mixer down to low and add 3 cups of powdered sugar, continue to beat until sugar is incorporated. Add cinnamon and mix. Turn mixer back up to medium and add vanilla and 2 Tbsp of milk or cream, beat for 3-4 minutes. If you are piping frosting you will want it a more stiff consistency. If you plan to spread frosting on cupcakes you may need to thin it with a little more milk or cream. Just add sugar or milk until you get the consistency you want.
If you want to tint the icing, add gel food coloring to small amounts in separate bowls to get desired colors.
To fill cupcakes, use a pastry bag and long straight tip. Place pastry cream in bag and push tip into top center of cupcake and squeeze cream into cupcake. The hole will be covered with icing later. Cupcakes with pastry cream will need to be kept in the refrigerator but you can take them out and let them warm to room temperature for serving.
After filling cupcakes, either spread or pipe frosting on cupcakes.
Decorate with sprinkles, edible glitter, luster dust or anything you like.
If these cupcakes don't get you in the Mardis Gras frame of mind then whip up a Hurricane. I guarantee that will do it!

Traditional Hurricane Recipe:
- 2 oz light rum
- 2 oz dark rum
- 2 oz passion fruit juice
- 1 oz orange juice
- ½ oz fresh lime juice
- 1 Tablespoon simple syrup
- 1 Tablespoon grenadine
- Garnish: orange slice and cherry
Shake all ingredients in a cocktail shaker with ice and strain into a Hurricane glass filled with ice. Garnish with a cherry and an orange slice.
Nothing says fun like cupcakes and rum! Cheers!
Sunday, March 2, 2014
Who Needs Gluten When You Have Chocolate
 |
| Fudgy Mint Brownies |
In addition, I have been doing a lot of research into gluten free baking for my upcoming Gluten Free Fridays here on the Brown Crock Baker. I have to admit I am a gluten glutton. Gluten is not something I've had to consider or given much thought to in my baking world, except for trying to make sure I develop as much of it as possible when baking many varieties of bread. But I do know there are many of you out there that either out of necessity or choice are avoiding gluten in your diets and I want to make sure some of my time is devoted to coming up with delicious options for you as well. So, why not start with brownies! Everybody loves a good brownie.
I am a fudge type brownie devotee. I love the super moist, dense, intense chocolate variety. I realize not everyone is on that same page. And I occasionally try to dial back some of the chocolate intensity when I know that Darlin' Mark and the rest of "those people" who wander around here under appreciating the shear beauty and healing powers of chocolate might nibble on one or two. And then sometimes I don't, knowing that will likely leave more for me. And I have found a kindred soul in my great nephew, Mason, who truly appreciates fine chocolate. He's from my side of the family. Smart boy.
One of my all time favorite super chocolaty brownie recipes is Martha Stewart's Fudgy Chocolate Brownies. I guarantee if she made these when she was in the Federal Pen, nobody gave her any crap. They probably didn't anyway. Martha's kinda scary. I love it for several reasons. First, and most important, the brownies have deep, intense chocolate flavor. They are also thick and chewy. And lastly, the recipe only makes an 8x8 pan sized batch which reduces the amount of calories I consume in them to five figures.
It only made sense to turn to Martha for my first try at gluten free brownies. And she didn't disappoint. Quite honestly, I can't think of a reason to make the flour variety after tasting these. Her recipe was for Fudgy Pecan Brownies but I recently picked up some Andes Creme de Menthe baking chips and decided to go the minty route. And again it only makes an 8x8 pan sized batch, making it diet friendly.
These are every bit as moist, fudgy and full of chocolate flavor as her flour based recipe. I think, if making the mint recipe again, I would either reduce the cinnamon to 1/4 teaspoon or omit altogether. I think I may omit the cinnamon in my next batch and substitute espresso powder in it's place. The cinnamon would be an important part of the flavor profile if making nut brownies in place of the mint.
No pictures of the process tonight. This weather has made me crankier than normal and I just didn't want to take pictures. And besides that, every surface in my kitchen is covered in baking paraphernalia right now and I didn't feel like moving it. See picture below if you don't believe me.

Gluten Free Fudgy Mint Brownies (adapted from Martha Stewart Fudgy Pecan Brownies)
Ingredients (Makes 8 x 8 sized pan)
6 Tbsp Unsalted Butter (plus extra for pan)
12 Ounces Semi-Sweet Chocolate Chips
1/3 Cup Corn Starch
1/4 Cup Cocoa Powder
1/4 Tsp Cinnamon
1/2 Tsp Salt
3 Large Eggs
1 Tsp Vanilla Extract
2/3 Cup Andes Creme de Menthe Baking Pieces
Process
Preheat oven to 350 degrees and butter bottom and sides of 8 x 8 baking pan. Line bottom and up 2 sides of pan with parchment paper, leaving about 2 inches of overhang to make a sling to lift the brownies out of the pan after baking.
In small mixing bowl whisk corn starch, cocoa powder, cinnamon and salt.
In medium mixing bowl, place 6 Tbsp unsalted butter, cut in pieces, and chocolate chips. Sit bowl over saucepan of simmering water to melt butter and chocolate. Gently stir occasionally until melted and smooth. (Martha says you can melt these in the microwave, but I never have any luck with that. I always end up cooking the dickens out of the chocolate. Martha is probably rolling her eyes right now. Whatever....Martha.)
Remove bowl from pan once chocolate and butter are melted.
Add sugar and vanilla to chocolate mixture and stir until mixed. Add eggs 1 at a time, completely incorporating after each egg. Add cornstarch/cocoa mixture and stir vigorously for 2 minutes. (If you have a big strong man type person around the house, he would come in handy about now. Mine is wandering around Memphis right now, so I just toughed it out.)
Fold in mint baking pieces until mixed.
Spread batter in prepared pan and bake on middle rack of oven for 25-30 minutes. (Martha says 35 minutes, but I was afraid they'd get dry. I also get tired of Martha being so bossy and sometimes rebel.) I baked mine for 30 minutes and they came out lovely.
Cool in pan on rack for 15 minutes, then remove from pan using parchment paper and let cool completely on rack. Once cooled, place brownies on parchment on cutting board and cut. Remove from parchment and store in air tight container.

And there you have delicious, fudgy, minty gluten free brownies to enjoy on a cold miserable night. Do they think by calling it something cheery sounding like "wintry mix" we'll forget it's nasty little frozen ice balls falling from the sky and covering every surface making it completely impossible to leave your house without breaking your neck?!!! Sorry. Maybe I need another brownie.
Bake Away, People!
Ice, Ice Baby
 |
| sigh |
Well, here I sit in scenic Birdseye in the midst of the 90th winter storm of the season. Darlin' Mark is a few hundred miles south in Memphis still working on that sticky situation with the Smuckers folks and apparently headed to a firearms extravaganza of some sort today. Hope the two aren't connected. Anyway, back to the lousy weather. So what's a girl to do when she's sitting at the bottom of the hill all alone in the middle of an ice and snow storm? Apparently try to bake her way through everything in the house.
Must run in the family because Big Sis Marybeth Miller, showing a monumental error in judgement, returned from the shores of the Gulf in Alabama late last night and finds herself in the same situation, different location. Last I heard from her she was getting ready to dive into a beignet recipe. I tried to talk her into stopping here on the way home so we could storm bake together, but Brother In Law Lou wouldn't cooperate. Afraid he'd be trapped in the holler til Easter, I believe.
I began a pre-storm bake last night by turning out a couple loaves of French bread, which worked quite nicely for French Toast this morning. Since that time, I've baked up a batch of gluten free Mint Brownies which are cooling in the kitchen, stirred up cinnamon pastry cream filling for the King Cake Cupcakes, which are next on the list. And have the beginnings of a loaf of sourdough bread trying to find a warm enough spot in my house to get the little wild yeasties up and moving.
I believe my next task will be to fix a Bloody Mary and contact the Spooners, Bill and Margaret, to make the trip down the hill before it's too slick to get back up and take some of this stuff home with them. Maybe if I lure them in with the promise of a Bloody Mary I can get them here. Of course, at some point in time when the snow starts dropping by buckets, Bill will have to come down and stand on his ATV and knock all the snow off my satellite dish on the roof so I can entertain (or torture) myself with more basketball viewing.
At this time, dear readers, I leave you to return to the kitchen to get those cupcakes knocked out, move that sourdough bread through the second stage of it's life and see if those brownies are ready for a taste test. Recipes to follow later tonight when I either run out of butter or drop from exhaustion! I prefer the latter. I've been known to have anxiety attacks from a low butter inventory.
Tuesday, February 25, 2014
Brie and Lindsey Want Cookies
 |
| My "get me to quitting time" treat this afternoon. |
For some sweet girls who are looking for a good cookie...
Chocolate Chip Cookies* (Makes 18 large cookies)
Ingredients
3/4 Cup Salted Butter, Melted
1 Cup Light Brown Sugar, Packed
1/2 Cup Granulated Sugar
1 Large Egg
1 Large Egg Yolk
1 Tbsp Vanilla Extract
2 Cups All Purpose Flour
1 Tsp Salt
1/2 Tsp Soda
Chocolate Chips (1-2 Cups depending on your preference)
Chopped Pecan or Walnuts (optional)
Process
Preheat oven to 325 degrees, line cookie sheets with parchment paper
In medium mixing bowl whisk together flour, salt and soda
In large mixing bowl combine melted butter, brown sugar and granulated sugar and whisk until all sugar is incorporated and mixture is smooth.
Add eggs, egg yolk and vanilla extract and whisk until completely mixed.
Add flour mixture to butter and sugar mixture stir with spoon until all flour is incorporated.
Add chocolate chips (and nuts if using) and stir to combine.
Cover bowl with plastic wrap and chill in refrigerator for 30 minutes.
Using 1/4 cup measuring cup or large scoop form walnut sized balls of cookie dough, placed about 2 inches apart on cookie sheet.
Prepare one sheet at a time, keeping remaining dough in refrigerator until just before ready to form balls and bake.
Bake for 13-15 minutes until edges just set and start to brown. Center of cookie will still appear moist and slightly under baked.
Cool on sheet for 5 minutes, then remove to rack to finish cooling.
Cookie dough balls can also be formed, placed in the freezer on the sheet until frozen, then placed in zipper style freezer bag and kept for 6 months. Easy way to just bake a cookie or two at a time. I still bake them at 325 degrees, just increase the baking time to about 18-20 minutes.
*This is the base recipe I use for Chocolate Chip, Chocolate Chip Pecan and Triple Chocolate Pecan. I use semi-sweet, dark and milk chocolate pieces for the Triple Chocolate Cookies.
Happy baking, Brie!
Lindsey, tell Brie thank you!
Sunday, February 23, 2014
A Farm is Born
 |
| A Farm is Born |
Just down County Rd N 600 E, near Dale, Indiana there's some weird doings going on. Tucked at the end of the road, near busy I-64 you'll find a family farm. A family farm in southern Indiana?! You don't say. But this isn't just any family farm. These folks are using crazy new ideas like having cattle, sheep and chickens wander around in fresh air and sunshine, happily grazing on things like native grasses, weeds, crawly bugs and the like. Who would have ever thought that something this revolutionary would work?
According to Jerry Steckler at Steckler Grassfed Farm there was no real master plan on his part when it all started back in 1986. He and his wife, Marsha, decided to take their family back to the land and moved from Newburgh, Indiana to the farm. As is typical of most small farms, the labor force comes from the family. Jerry and Marsha found themselves a little short on "man "power when they were blessed with a multitude of daughters. Maybe there was another way of doing things requiring less muscle and more innovation. An informational meeting with the folks from Purdue on rotational grazing provided the Stecklers with an alternative way of running the family business.
Just a quick lesson on rotational grazing so you can understand how it has played a part in the evolution of the Steckler's farm. Rotational grazing is the system of moving the farm critters between partitioned pastures of native grasses and plants. This allows the individual pastures to recover from the grazing and allow for more natural feeding, less need for supplemental feedings, reducing the need for growing large crops of hay, row crops and other things. Believe me, Jerry can explain this much more clearly than I can. And will be happy to do this if you stop by to visit them.
And so it began. As Jerry points out it's been an evolution. You don't just wake up one day and tell all the critters to go forth, graze and good luck. The herd had to be transitioned to the natural grazing, pastures had to develop. Additions of sheep and poultry also allows for greater use of the land and native plants as the sheep prefer things the cattle leave behind and the chickens can peck about keeping the bug population within reasonable limits. If you think about it, it required some reverse evolution since these "new" ideas are really the way God and nature intended for these animals to live and thrive. Sunshine, fresh air, green grasses, no antibiotics, no hormones and little disease and stress all add up to better lives for the animals and the people who consume the food they produce.
While the farm hasn't yet issued a formal mission statement, Jerry says it's pretty simple. They want people to have options for locally produced, organic, natural foods. "People vote for what kind of foods they want for their families by where they spend their dollars. What we are doing is working with nature to bring people wholesome, healthy food." He also recommends that you check out the Weston Price Foundation. Lots of interesting information and studies about our foods, environment, ways of life and the impact they have on our health and well being.
Beginning in 1995, poultry became the first offering from the farm. You can still order roasting and stewing hens, turkeys and buy eggs at the farm store. Over the years they've added lamb, beef and pork. And in 2007 the farm received its organic certification.
When I asked Jerry if he had all of this in mind back in the beginning he admits that he did not. He has a firm faith that greater powers have been at work at the farm. "God's got his hand on what we're doing here." The Stecklers have challenges just like the rest of us. Extremely dry conditions in 2012 led to reduction in useful pasture requiring a thinning of the herd and bulk beef availability is still recovering. Piglets don't grow as fast as anticipated and pork offerings are reduced. But where one door closes, another opens. And what walks through that door? Cheese!
Cheese production was something Jerry said he had been thinking about but hadn't taken the steps to make it happen. That push came when through a series of circumstances the farm lost buyers for its organic milk. Finding themselves with a glut of milk, cheese production seemed to be the next logical step. Working with consultants and rural development grants, Steckler Grassfed received a state permit in 2012 for on site cheese production. They currently offer four varieties, Colby, Cheddar, Monterey and Pepper Jack. The cheese has led to increased recognition of the farm and its brand. Moving its products into retail markets throughout southern Indiana and northern Kentucky. They've developed relationships with many of the local wineries that dot the landscape here and offer tastings at local retail markets carrying their product. They have plans to participate in the Evansville Farmers' Market this year and possibly other locations as well.
The farm was recently recognized as Member of the Year by the Spencer County Chamber of Commerce.
Jerry acknowledges it hasn't been easy or fast and he and the family continue to work hard to produce products they feel confident in and are proud of. But in the end he is quick to mention that "we still have more blessings than we don't have."
If you live in the area, I recommend you make a trip to the farm and to meet with Jerry and the family yourself. Visit the Farm Store and take advantage of the opportunity to see where healthy food is produced. I promise to do some follow up posts here on what I think will become regular visits and once this brutal winter moves on will have pictures of the Stecklers and happy cows lazing in sunny green pastures.
For more on the Stecklers' story, Farm Store hours, retail locations and how to order products from the farm, visit stecklergrassfed.com. You should also like their Facebook page and follow on twitter, if you're a tweeting kind of person.
On my recent visit, I picked up some Bright Meadows Organic Cheddar cheese and eggs. I decided a while ago I wanted to come up with a Cheddar Apple Scone and wanted to wait until I had some special cheese to use. So this week I began scribbling on my legal pad and finished up by baking a test batch on Saturday. Darlin' Mark approved, though he did suggest a few more apples next time, so I'm sharing the recipe with you today. Extra apples included.
 |
| It doesn't get more American than this....classic apple and cheddar combo. Cheese made with fresh, organic milk from happy Hoosier cows! |
Cheddar Apple Scones (makes 8 large scones)
Ingredients
2 Medium Apples ( I used Granny Smith and Jonagold.)
1 Tsp Ground Cinnamon
1/4 Tsp Freshly Grated or Ground Nutmeg
6 Tbsp Unsalted Butter, Frozen and Grated
4 Oz Sharp or Extra Sharp Cheddar Cheese (I used Steckler Farm Bright Meadows Organic Cheddar)
1/2 Cup Sour Cream or Plain Yogurt
1/3 Cup Whole Milk
2 Cups All Purpose Flour
1/2 Cup Granulated Sugar
2 Tsp Baking Powder
1/4 Tsp Baking Soda
1/4 Tsp Salt
Process
Preheat oven to 325 degrees
Peel, core and chop apples into approximately 1/2 inch pieces. Lay in single layer on parchment paper lined baking sheet. Sprinkle with cinnamon and nutmeg. Bake in oven for 20-25 minutes until just start to soften and appear slightly dry. Remove from baking sheet and place on plate or bowl and refrigerate until cool.

While apples are cooling, grate 6 Tbsp of frozen butter using large side of box grater, food processor or mandolin. Place butter on plate or in med bowl and put back in freezer until ready to use.
 |
| It's like butter confetti....now that's a party! |
Chop cheddar cheese into 1/4 inch cubes and refrigerate until needed.

 |
| Chop a little extra for nibbling. |
Combine sour cream and milk in small bowl or measuring cup and refrigerate until needed.

In medium mixing bowl, whisk flour, sugar, powder, soda and salt together. Set aside.
 |
| Where's the soda? |
 |
| Always late for photo shoots...what a diva! |

Once apples have cooled, remove butter from freezer and toss in flour until all bits are coated in flour.

Make a well in center of flour/butter mixture and add milk/sour cream mixture. Using plastic spatula or scraper, lightly fold just until liquid is absorbed. Dough will be very dry and crumbly appearing. (the liquid from the apples and additional fat from the cheese will moisten the dough when baking.)


Turn dough onto floured surface and lightly knead 5-6 times, pat into rough square.

Using floured rolling pin, roll into 12 x 12 square.
Using bench scraper or large spatula, starting at far side, fold dough by thirds like a business letter.

Then fold each end over to form a 4 x 4 inch square.

Place on floured plate and freeze for 5-10 minutes.
Take dough from freezer, roll into 12 x 12 inch square. Sprinkle chopped apples and cheese over dough. Lightly press apples and cheese into dough.

Start at far side, roll dough towards you into tight log.

With seam side down, press and pat log into 12 x 4 inch rectangle.
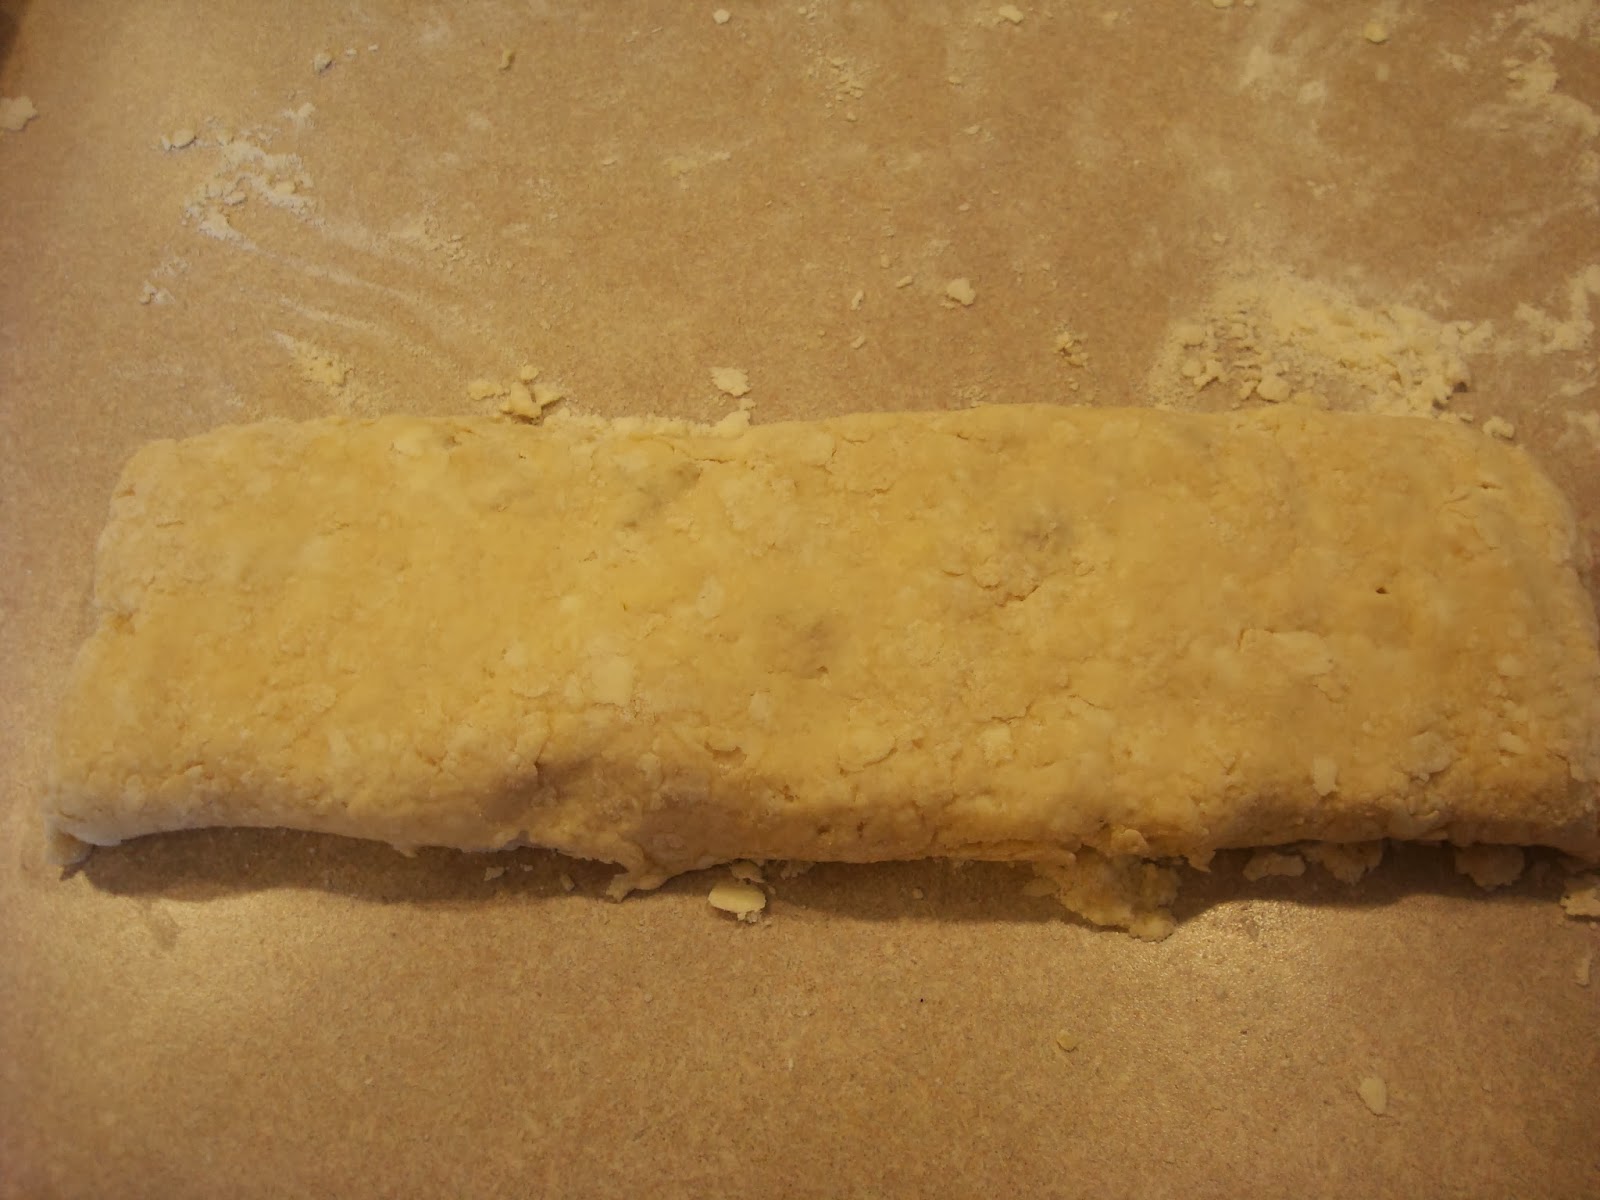
Cut in half. Then cut each half into 2 pieces. Then cut each square into triangles.

If baking immediately, heat oven to 425 degrees, brush tops with cream and sprinkle with cinnamon sugar. Bake 15-20 minutes until golden brown.

Can be frozen and baked at later time. Remove from freezer, brush tops with cream, sprinkle with cinnamon sugar and bake at 350 degrees for 20-25 minutes.

Subscribe to:
Comments (Atom)